I will show you how to create a DataSource in GlassFish version 2.1 because there were a lot of properties and I had a lot of problems when I've try to register datasource in glassfish for the first time.
1) You have to download JDBC driver for your database. For example I will use MySQL and I will use Connector/J driver that you can download from mysql official web site.
2) Place the JDBC driver in for example D:\glassfishv21\domains\domain1\lib\ext for example my driver is mysql-connector-java-5.0.4.jar
3) Start the domain for example domain1 (asadmin start-domain domain1)
4) go to http://localhost:4848 and login as admin. By default the username is 'admin' and the password is 'adminadmin'
5) go to Resources/JDBC/Connection Pools
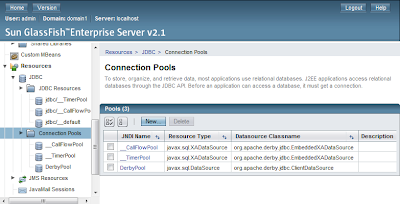
-First we will create a connection pool. Click the 'NEW' button
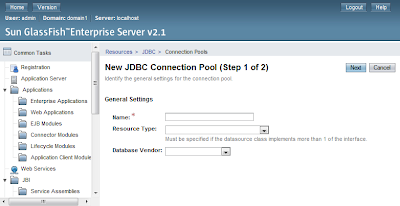
-Than you must type:
- Name: of the connection pool for example MySQL Lessson
- Resource Type: javax.sql.ConnectionPoolDataSource
- Database Vendor: MySQL
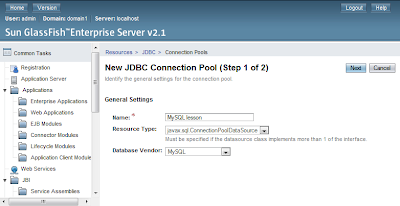
-Press 'Next'
-On the Next step scroll down you will see a list of properties. The important for you (you must select this checkboxes) are: 'user','password','url'. If some of this is missing for example there is no 'url' if the vendor is Oracle you can add it using the Add property button.
- user : root
- password : rootpassword
- url : jdbc:mysql://localhost:3306/lesson?autoReconnect=true&characterEncoding=utf8
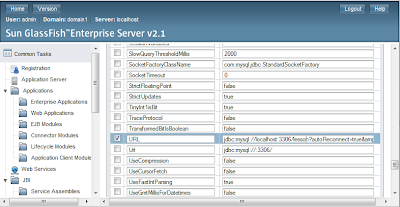
-When you fill this 3 properties you must press 'Save'
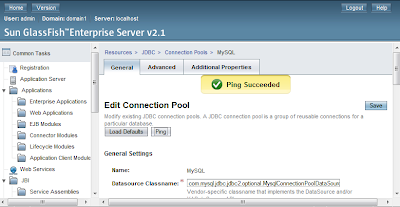
-Than select again your datasource and press 'Ping' to see is everything correct
You are now ready to create your DataSource that will use this connection pool.
6)go to Resources/JDBC/JDBC Resources
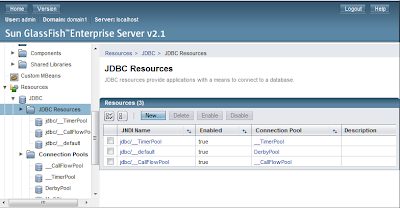
- Press 'New'
- Type some jndi name of the resource that you will use latter in your project(s)
- Choose PoolName to be the pool that you have just created.

Now we have DataSource that we can use from any Enterprise/Web Application.
In the next lesson I will create Java EE 5 application using JPA, EJB, JSF using eclipse and this app will use this datasource.
1) You have to download JDBC driver for your database. For example I will use MySQL and I will use Connector/J driver that you can download from mysql official web site.
2) Place the JDBC driver in for example D:\glassfishv21\domains\domain1\lib\ext for example my driver is mysql-connector-java-5.0.4.jar
3) Start the domain for example domain1 (asadmin start-domain domain1)
4) go to http://localhost:4848 and login as admin. By default the username is 'admin' and the password is 'adminadmin'
5) go to Resources/JDBC/Connection Pools

-First we will create a connection pool. Click the 'NEW' button

-Than you must type:
- Name: of the connection pool for example MySQL Lessson
- Resource Type: javax.sql.ConnectionPoolDataSource
- Database Vendor: MySQL

-Press 'Next'
-On the Next step scroll down you will see a list of properties. The important for you (you must select this checkboxes) are: 'user','password','url'. If some of this is missing for example there is no 'url' if the vendor is Oracle you can add it using the Add property button.
- user : root
- password : rootpassword
- url : jdbc:mysql://localhost:3306/lesson?autoReconnect=true&characterEncoding=utf8

-When you fill this 3 properties you must press 'Save'
-Than select again your datasource and press 'Ping' to see is everything correct

You are now ready to create your DataSource that will use this connection pool.
6)go to Resources/JDBC/JDBC Resources

- Press 'New'
- Type some jndi name of the resource that you will use latter in your project(s)
- Choose PoolName to be the pool that you have just created.

Now we have DataSource that we can use from any Enterprise/Web Application.
In the next lesson I will create Java EE 5 application using JPA, EJB, JSF using eclipse and this app will use this datasource.
Comments
So you can check it :)