Today I will show you how to create Enterprise Application using Java EE 5 and GlassFish.
I will use
- Eclipse 3.5 + WTP
- GlassFish v. 2.1
- JSF Mojarra implementation.
- EJB 3.0.
- JPA Toplink essentials implementation.
- MySQL
No NetBeans or JDeveloper magic involved :)
The prerequirement is:
Add datasource in glassfish. Read this how you can make this here: http://gochev.blogspot.com/2009/10/creating-datasource-in-glassfish-v-21.html
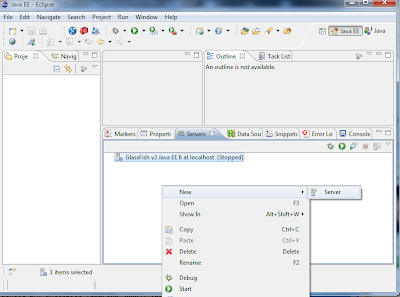
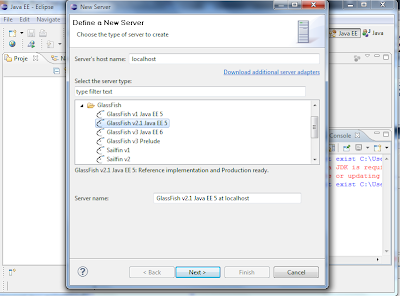
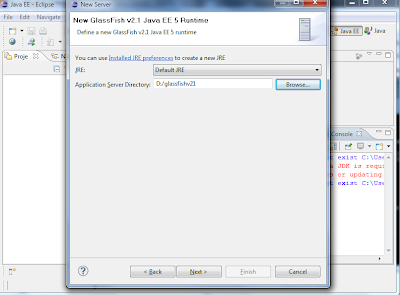
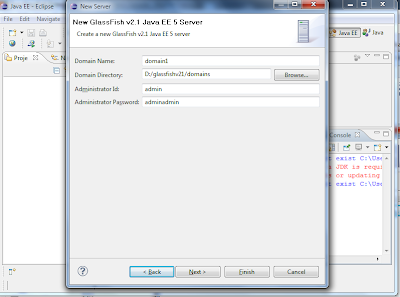
1) First you need to add glassfish in your eclipse.
- Go to Servers View
- Right Click, New
- Choose GlassFish v 2.1 if you dont have glassfish click on Download additional adapters link choose glassfish wait and restart eclipse. Than try again.
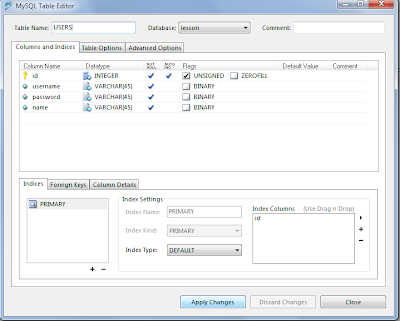
2) Create the database
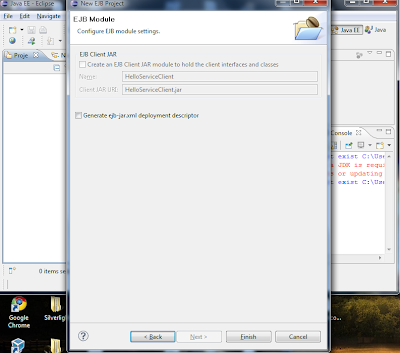
3) Create EJB project
4) Add persistance.xml file in META-INF folder
5) Create Simple Entity org.joke.model.User
6) Create HelloService EJB that will use EntityManager
- The local interface is:
-The implementation is:
7) Create Dynamic Web Project
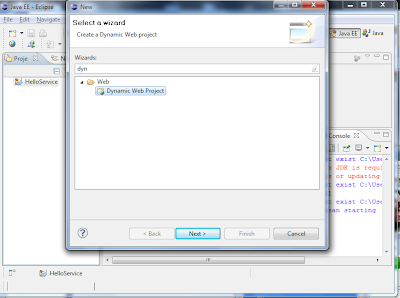
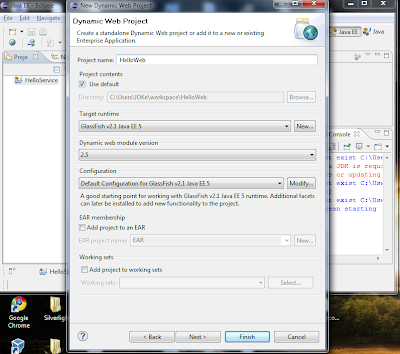
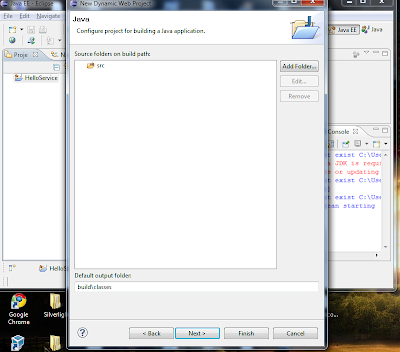
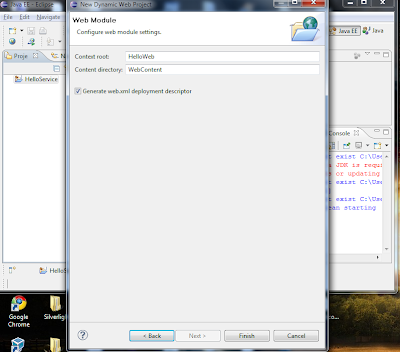
8) Add JSF to this Dynamic Web Project
- Edit web.xml and add FacesServlet
9) I will use a very simple login form (login.jsp) and home.jsp where you will go if login is successfull.
- The home.jsp looks like this:
- and faces-config.xml looks like this:
-The UserBean source is:
10) You can notice that I use HelloService and User model class in the Dynamic web project. To do this you have to add the service project as referenced by the web project.
- Right click on the web project and choose Properties
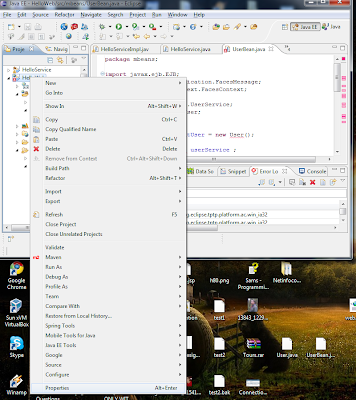
-Go to Build path/Projects
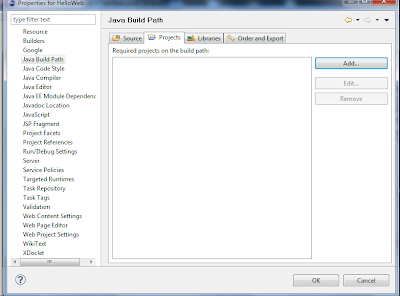
-Add the services project
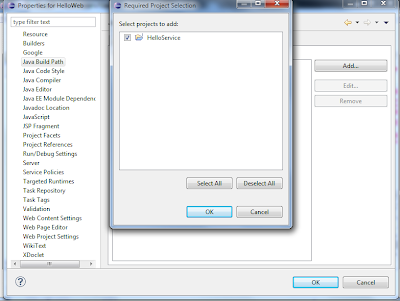
-Now check the UserBean it should not contain any errors.
11) Create Enterprise Applicatin and add Web and EJB module to this application
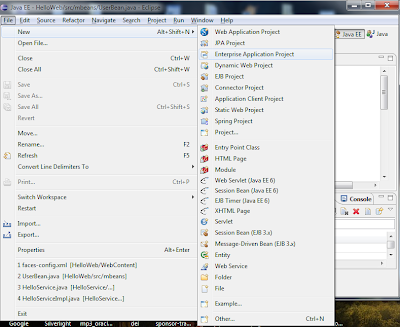
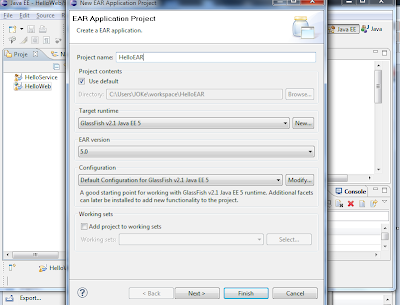
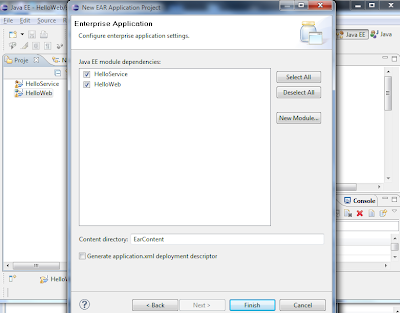
12) Right click on the Enterprise Application and choose Run on server.
13) go to http://localhost:8080/HelloWeb/login.jsf and test it :)
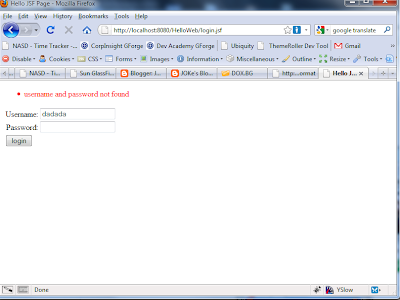
That's all.
Note that we did not include any third party jar files in this projects. This is because GlassFish include JSF 1.2 Mojarra implementation and Toplink JPA implementation.
*Update : full source code of the example you can download from: http://dl.getdropbox.com/u/887821/HelloJavaEE5.rar
I will use
- Eclipse 3.5 + WTP
- GlassFish v. 2.1
- JSF Mojarra implementation.
- EJB 3.0.
- JPA Toplink essentials implementation.
- MySQL
No NetBeans or JDeveloper magic involved :)
The prerequirement is:
Add datasource in glassfish. Read this how you can make this here: http://gochev.blogspot.com/2009/10/creating-datasource-in-glassfish-v-21.html
1) First you need to add glassfish in your eclipse.
- Go to Servers View
- Right Click, New
- Choose GlassFish v 2.1 if you dont have glassfish click on Download additional adapters link choose glassfish wait and restart eclipse. Than try again.


2) Create the database

CREATE TABLE `lesson`.`USERS` (
  `id` INTEGER UNSIGNED NOT NULL AUTO_INCREMENT,
  `username` VARCHAR(45) NOT NULL,
  `password` VARCHAR(45) NOT NULL,
  `name` VARCHAR(45) NOT NULL,
  PRIMARY KEY (`id`)
)
ENGINE = InnoDB;
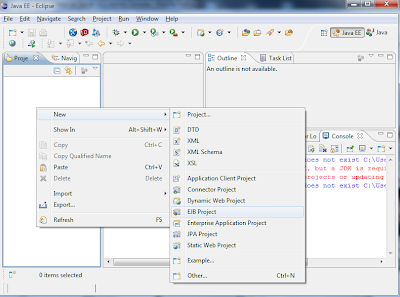
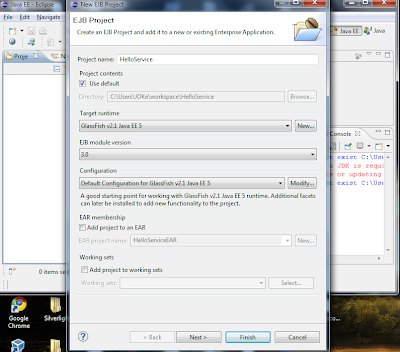
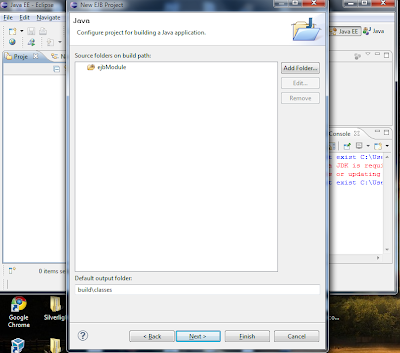
3) Create EJB project


4) Add persistance.xml file in META-INF folder
<?xml version="1.0" encoding="UTF-8"?>

<persistence xmlns="http://java.sun.com/xml/ns/persistence"
    xmlns:xsi="http://www.w3.org/2001/XMLSchema-instance" version="1.0">

    <persistence-unit name="toursUnit">
     <jta-data-source>lessonMySQL</jta-data-source>
        <class>org.joke.model.User</class>
    </persistence-unit>

</persistence>
5) Create Simple Entity org.joke.model.User
package org.joke.model;

import javax.persistence.Basic;
import javax.persistence.Entity;
import javax.persistence.GeneratedValue;
import javax.persistence.GenerationType;
import javax.persistence.Id;
import javax.persistence.Table;

@Entity
@Table(name = "USERS")
public class User {

 private Long id;
 private String name;
 private String username;
 private String password;

 @Id
 @GeneratedValue(strategy = GenerationType.IDENTITY)
 public Long getId() {
  return id;
 }

 public void setId(Long id) {
  this.id = id;
 }

 @Basic
 public String getName() {
  return name;
 }

 public void setName(String name) {
  this.name = name;
 }

 @Basic
 public String getUsername() {
  return username;
 }

 public void setUsername(String username) {
  this.username = username;
 }

 @Basic
 public String getPassword() {
  return password;
 }

 public void setPassword(String password) {
  this.password = password;
 }


}
6) Create HelloService EJB that will use EntityManager
- The local interface is:
package org.joke.service;
import javax.ejb.Local;

import org.joke.model.User;

@Local
public interface HelloService {
 public User login(String username,String password);
}
-The implementation is:
package org.joke.service;

import java.util.List;

import javax.ejb.Stateless;
import javax.persistence.EntityManager;
import javax.persistence.PersistenceContext;
import javax.persistence.Query;

import org.joke.model.User;

/**
 * Session Bean implementation class HelloServiceImpl
 */
@Stateless
public class HelloServiceImpl implements HelloService {

 @PersistenceContext(unitName = "toursUnit")
 EntityManager em;

 public HelloServiceImpl() {
 }

 @Override
 public User login(String username, String password) {
  Query query = em
    .createQuery("select u from User u where u.username = :username and u.password = :password");
  query.setParameter("username", username);
  query.setParameter("password", password);

  List<User> result = query.getResultList();

  if (result != null && result.size() > 0) {
   return result.get(0); //first user
  }
  return null;
 }

}
7) Create Dynamic Web Project


8) Add JSF to this Dynamic Web Project
- Edit web.xml and add FacesServlet
 <servlet>
  <display-name>FacesServlet</display-name>
  <servlet-name>Faces Servlet</servlet-name>
  <servlet-class>javax.faces.webapp.FacesServlet</servlet-class>
  <load-on-startup>1</load-on-startup>
 </servlet>
 <servlet-mapping>
  <servlet-name>Faces Servlet</servlet-name>
  <url-pattern>*.jsf</url-pattern>
 </servlet-mapping>
9) I will use a very simple login form (login.jsp) and home.jsp where you will go if login is successfull.
<?xml version="1.0" encoding="UTF-8" ?>
<jsp:root xmlns:jsp="http://java.sun.com/JSP/Page"
 xmlns:f="http://java.sun.com/jsf/core"
 xmlns:h="http://java.sun.com/jsf/html" version="2.1">
 <jsp:directive.page language="java"
  contentType="text/html; charset=UTF-8" pageEncoding="UTF-8" />
 <jsp:text>
  <![CDATA[ <?xml version="1.0" encoding="UTF-8" ?> ]]>
 </jsp:text>
 <jsp:text>
  <![CDATA[ <!DOCTYPE html PUBLIC "-//W3C//DTD XHTML 1.0 Transitional//EN" "http://www.w3.org/TR/xhtml1/DTD/xhtml1-transitional.dtd"> ]]>
 </jsp:text>
 <html xmlns="http://www.w3.org/1999/xhtml">
 <head>
 <meta http-equiv="Content-Type" content="text/html; charset=UTF-8" />
 <title>Hello JSF Page</title>
 </head>
 <body>
 <f:view>
  <h:messages style="color:red;"></h:messages>
  <h:form id="loginForm">
   <table>
    <tr>
     <td align="right"><h:outputText value="Username: " /></td>
     <td><h:inputText id="username"
      value="#{userBean.currentUser.username}" required="true">
      <f:validateLength maximum="10" minimum="3" />
     </h:inputText></td>
     <td><h:message for="username" style="color:red;" /></td>
    </tr>
    <tr>
     <td align="right"><h:outputText value="Password: " /></td>
     <td><h:inputSecret id="password"
      value="#{userBean.currentUser.password}" required="true" /></td>
     <td><h:message for="password" style="color:red;" /></td>
    </tr>
    <tr>
     <td colspan="3"><h:commandButton value="login"
      action="#{userBean.login}" /></td>
    </tr>
   </table>


  </h:form>
 </f:view>
 </body>
 </html>
</jsp:root>
- The home.jsp looks like this:
<?xml version="1.0" encoding="UTF-8" ?>
<jsp:root xmlns:jsp="http://java.sun.com/JSP/Page"
 xmlns:f="http://java.sun.com/jsf/core"
 xmlns:h="http://java.sun.com/jsf/html" version="2.1">
 <jsp:directive.page language="java"
  contentType="text/html; charset=UTF-8" pageEncoding="UTF-8" />
 <jsp:text>
  <![CDATA[ <?xml version="1.0" encoding="UTF-8" ?> ]]>
 </jsp:text>
 <jsp:text>
  <![CDATA[ <!DOCTYPE html PUBLIC "-//W3C//DTD XHTML 1.0 Transitional//EN" "http://www.w3.org/TR/xhtml1/DTD/xhtml1-transitional.dtd"> ]]>
 </jsp:text>
 <html xmlns="http://www.w3.org/1999/xhtml">
 <head>
 <meta http-equiv="Content-Type" content="text/html; charset=UTF-8" />
 <title>Hello JSF Page</title>
 </head>
 <body>
 <f:view>
   Welcome user

 </f:view>
 </body>
 </html>
</jsp:root>
- and faces-config.xml looks like this:
<?xml version="1.0" encoding="UTF-8"?>
<faces-config xmlns="http://java.sun.com/xml/ns/javaee"
 xmlns:xsi="http://www.w3.org/2001/XMLSchema-instance"
 xsi:schemaLocation="http://java.sun.com/xml/ns/javaee
      http://java.sun.com/xml/ns/javaee/web-facesconfig_1_2.xsd"
 version="1.2">
 <navigation-rule>
  <from-view-id>/login.jsp</from-view-id>
  <navigation-case>
   <from-outcome>success</from-outcome>
   <to-view-id>/home.jsp</to-view-id>
  </navigation-case>
 </navigation-rule>

 <managed-bean>
  <managed-bean-name>userBean</managed-bean-name>
  <managed-bean-class>mbeans.UserBean</managed-bean-class>
  <managed-bean-scope>session</managed-bean-scope>
 </managed-bean>
</faces-config>
-The UserBean source is:
package mbeans;

import javax.ejb.EJB;
import javax.faces.application.FacesMessage;
import javax.faces.context.FacesContext;

import org.joke.model.User;
import org.joke.service.HelloService;

public class UserBean {
 private User currentUser = new User();
 @EJB
 private HelloService helloService ;

 public void setCurrentUser(User currentUser) {
  this.currentUser = currentUser;
 }

 public User getCurrentUser() {
  return currentUser;
 }

 public String login() {
  User result = helloService.login(currentUser.getUsername(),
    currentUser.getPassword());
  if (result!=null) {
   currentUser = result;
   return "success";
  }
  FacesContext.getCurrentInstance().addMessage(
    null,
    new FacesMessage("username and password not found"));
  return null;
 }

}
10) You can notice that I use HelloService and User model class in the Dynamic web project. To do this you have to add the service project as referenced by the web project.
- Right click on the web project and choose Properties

-Go to Build path/Projects

-Add the services project

-Now check the UserBean it should not contain any errors.
11) Create Enterprise Applicatin and add Web and EJB module to this application


12) Right click on the Enterprise Application and choose Run on server.
13) go to http://localhost:8080/HelloWeb/login.jsf and test it :)

That's all.
Note that we did not include any third party jar files in this projects. This is because GlassFish include JSF 1.2 Mojarra implementation and Toplink JPA implementation.
*Update : full source code of the example you can download from: http://dl.getdropbox.com/u/887821/HelloJavaEE5.rar
Comments
Really shows the basics well to beginners :)
You could trim the code a little here and there. The @Basic annotation for instance isn't required, since it's the default anyway.
In your backing bean (UserBean), I think you should ommit the setter for current user. It's never used and for the purpose of this example you should emphasis it's a read only property.
Also, it might be better to make a distinction between the User instance you use for obtaining the user name and password and the user you get back from your service. Since the UserBean is session scoped, running the login page again will now change the name of the 'current user', which is a somewhat unintentional side-effect of sharing the same user instance for two purposes.
All your notes are totally correct.
- to remove the @Basic annotation
- to make distinction between the User instance returned from the service and the current instance :)
- and maybe one note from me:to make the HelpService to be UserService :)
I will update it when I have time thanks for the notes :)
Another approach by using netbeans wizards:
entity bean + session bean + servlet + jsp in a mvc way!
http://programmaremobile.blogspot.com/2009/01/java-ee-how-to-use-ejb-and-web.html
I would like to know how I can install "MySql Table Editor" to see my database.
Thank you!
I saw in your example at the step 2) "Create the database", the GUI with the title "MySQL Table Editor". Which software is it?
Thank you,
Lan
So the answer is: MySQL Query Tools, part of MySQL Gui Tools
Thanks once again.